Wednesday, December 19, 2007

Ebay and Ecko - Another win!

We've been using the same old colander for over 20 years - a cheap (yet obviously sturdy) buck ninety-nine Odd Lots plastic colander. Now, if yuou've read some of my older posts, you know I have nothing against using durable old kitchen equipment. As a matter of fact, I prefer it. So when a 50+ year old Ecko Flint Stainless colander came up on my saved search for Ecko stuff on Ebay, I was pretty jazzed. I immediately put it on my watch list and bid on it onthe final day of the auction. I probably paid more for it than I should have, and shipping was, wel, shipping always seems high to me, but the seller sent it out immediately, it was exactly as described and packed very well. Into the dishwater and then right to work it went, draining that night's pasta for dinner.

Another addition to my working Ecko collection. Yippe for me!
11 inches from side to side and 4 1/2 inches tall


The stampings on the bottom


Enjoy,
Lorence

Tuesday, December 18, 2007

Tilapia Stuffed with Crabmeat

What to make tonight...Same old question, made harder by long stretches between grocery store excursions due to colds and bronchitis...I got lucky, though, a couple of weeks ago as we were "recovering". We all felt somewhat better and were hungry for dinner. What do we have? Nothing obvious... Lets dig around in the freezer... Hey, look Tilapia! Ok, that could be good if I had some way of making it, um, interesting. Tilapia *can* be a little bland. So I went rooting around for something, anything to do with the fish & I found this recipe on Recipezaar. I've had a can of crabmeat in the cupboard for a couple of months just itching to be used. The perfect opportunity, I thought.

I was right.

The recipezaar version calls it "Crabmeat Stuffed Tilapia". Well, not really. I couldn't see anyway to roll the little fillets around the crab mixture, as the original recipe on http://www.blogger.com/www.tilapia.ws describes, and I didn't want to "sandwhich" the stuffing between fillets as the recipezaar recipe called for. I did something just slightly different and wrapped a fillet over a mound of crabmeat mixture. They were big enough. You'll see what I mean below.

This was a very good tasting & easy to prepare dish. Nice crab flavor (even better with some fresher fillets & crabmeat if handy). We'll definately be making this again.

Tilapia Stuffed with Crabmeat
Ingredients:
1 small onion, chopped fine
1 celery rib, chopped fine
4 tablespoons unsalted butter
1/4 cup fresh parsley (yeah, I had to use dried, but it worked just fine)
1/2 cup breadcrumbs, unseasoned (we used fresh from whole wheat bread)
8 ounces white crab meat (I only had a 6 oz. can of BumbleBee)
1 tablespoon lemon juice
1/8 tablespoon cayenne pepper
4 (6 ounce) tilapia fillets, approximately 6 oz each (had 6 fillets in the bag)
2 tablespoons butter, Melted
paprika

Directions:
1. Preheat the oven to 400°F.
2. Chop the onion and celery into fine pieces.
3. Flake the crabmeat and check for pieces of shells. I drained it a bit, too.
4. Sauté the onion and celery in butter until tender.
5. Add the parsley, stir, saute for just a bit more and remove from heat.
6. Stir in the bread crumbs, crab meat, lemon juice and cayenne pepper.
7. Spray a casserole or oven pan with cooking spray. I used a foil lined pan.
8. Make a small mound of the mixture, then drape a tilapia fillets over it as shown inthe photo.
9. Sprinkle with melted butter and paprika.
10. Place in a 400°F oven for about 15 to20 minutes until the tilapia flakes easily with a fork.
"Stuffing" the tilapia.


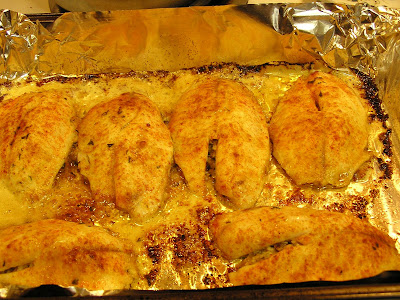
After about 18 minutes in the oven...

Plated, with some quick steamed edemame.


Give this a try - quick and tasty.

Enjoy,
Lorence

Monday, December 17, 2007

Jenny's Butter Cookies - 'Tis the season!


Our friend, Jenny, gave us this recipe several years ago. She's made them every Christmas for years, and since we got the recipe, so do we. As a matter of fact, Santa gets a batch, fresh made on Christmas Eve, right along side the reindeer's carrot and a can of Coke (you did know Santa loves his Coca-Cola, didn't you?).


Me and Boogie, XMas Eve, 2004
 
The Boog, XMas Eve, 2012

The Boog, XMas Eve, 2014

The Boog, XMas Eve, 2016

The Boog, XMas Eve, 2017

The Boog, XMas Eve, 2018

The Boog, XMas Eve, 2019

The Boog, XMas Eve, 2020

We always enjoy making these simple cookies. It's a lot of fun rolling the dough in the sugar crystals and squishing them down. We used to use a glass that was just the right size, but it cracked and broke several springs ago, and for a while we struggled to find a new "squisher". We even used the bottom of a pinot grigio bottle one year until we discovered that the bottom of our sugar shaker was a perfect fit. Usually we empty it out first 'cause it needs to be degreased afterwards...

This recipe makes about 2 dozen cookies.

Jenny's Butter Cookies
Ingredients:
1 Cup (2 Sticks) Butter
¾ cup light Brown Sugar
1 teaspoon Vanilla
2 Cups sifted flour
colored granulated sugar
Pecan halves

Directions:
Preheat the oven to 350˚.
Cream the butter & the brown sugar
Blend in the vanilla
Gradually add the flour, mixing well.
Chill the dough for at least ½ hour.
Pull off about 1 teaspoon of the dough and roll it into a ball.
Roll the dough ball in the sugar crystals to coat it well.
Flatten the ball to about ¼” thickness.
Press a pecan halve into the center.
Place the cookie on a cookie sheet lined with parchment paper.
Bake 10-12 minutes at 350˚.
Let cool, bite, chew, swallow, say yum...


The last bit of the dough


A dough ball ready to be squished


A dough ball being rolled in sugar crystals


Squishing...


Getting the pecan pressed into it...


Ready for the oven (350˚)


And done! Out of the oven.


2 dozen (minus the one I ate...)


The one I ate - say goodbye!


Enjoy,
Lorence

Saturday, December 15, 2007

Chicken in Vinegar Sauce

Some years ago I bought this HUGE cookbook at a book sale they had at work, "The Complete Step-By-Step Cook Book". The thing is so big that it won't even fit on my scanner. I've made a few dishes from it over the years, including this one a couple of times just this past fall. It's pretty straight forward and has lots of garlic in it, always a plus! We all liked it very much and I'll be making it again soon. The recipe calls for sherry vinegar,which I didn't have, so I used what I did have - champagne vinegar the first time and red wine vinegar the second. Both worked just fine. I suppose I might even try rice wine vinegar next time. I served this dish with couscous the first time and egg noodles the second.

Ingredients:
4 Boneless Skinless Chicken Breasts
1/3 cup Olive oil
12 garlic cloves, sliced, divided, 4 cloves and 8 cloves
   -(see, I told you there was lots of garlic!)
1 small onion, finely chopped
3 Tablespoons Sherry Vinegar (or whatever you have...)
1 Tablespoon Paprika
1 ½ Tablespoons chopped fresh Oregano
2 Tablespoons fresh Breadcrumbs
1 ¼ cups Chicken Stock
salt & fresh ground pepper


Directions:
1. Season the chicken with salt and pepper
2. Heat the olive oil in heavy pot just large enought o hold the breasts with out crowding. Add the chicken and cook on both sides, 10 minutes over medium heat.
3. Add 4 cloves of the sliced garlic and onion. Continue to cook until the chicken os lightly browned all over, about 5 minutes more.


4. Remove the chicken to a plate and keep warm. Stir in the vinegar and bring to a boil for 2 to 3 minutes.
5. Combine the remaining 8 cloves of garlic with a little salt, the oregano, and paprika. Pound it all together then add the bread crumbs and stir in a quarter of the chicken stock.


6. Pour the garlic-stock mixture over the chicken and add the remaining stock.

7. Cook for 20 minutes, until the chicken is tender and the sauce is fairly thick.

The last part of the recipe says to "Adjust seasoning and amout of vinegar, if necessary". I never know what this means when I first make a new dish, so I do the adjustments the next time around. In the case of this dish, I didn't have to do anything.


'Twas tasty.

Enjoy,
Lorence

Friday, December 14, 2007

I Made Butter! Sweet Cream Butter!

Today, I came across a very nice website called Indian Food Rocks, and on one of the pages there was a very nice entry on making Homemade Sweet Cream Butter. I read it and couldn't believe it could possibly be that simple to make fresh homemade butter. I decided to stop on the way home, pick up some heavy whipping cream and make some to have with dinner (Classic Stuffed Green Pappers).

IFR has a great description and some fabulous photos of the process. After getting the peppers into the water to parboil, I started the butter process. I didn't have a jar to put it in, so I used a 2 cup Rubbermaid container that I knew would seal tightly, then started shaking. And shaking. And shaking, shaking, shaking, shaking, shaking, shaking, shaking, shaking...I shook it alot, for about 15 minutes. At one point towards the end of the shaking, it seemed like there was just a solid mass in the container and nothing was moving around, so I shook it REALLY hard for a minute and all of a sudden the solid seperated out from the liquid and I had butter. Real butter. couldn't belive it - it really was that simple!

Here's the start: and the end product:
Ready for the table:


And here's how you can do it:

Pour about 1/3 to 1/2 cup of heavy whipping cream into a container that will seal tightly and not come loose even with vigorous shaking.
Close the lid (make sure it is sealed well!) and shake the bejesus out of it for a good 10 minutes. When I was shaking it, I was getting 300+ shakes per minute. After about 10 minutes, you will notice that the cream isn't moving very well inside the container. Don't worry, you're almost there, just shake harder. HARDER DAMN IT, HARDER! When it looks like there's a solid mass in the bottom of the container and just a bunch of milk sloshing around it, it's probably done. Wait... Shake it some more! Ok, now it's done. Pour off the liquid (buttermilk! You can save it to bake with, or make curry with or just drink). Put the butter into a container for use.
I refrigerated mine until the peppers were ready and we spread it on some store bought crusty bread. Mmmmmm....

since there are no presevratives at all in this, it won't keep long, but if you find it as yummy as we did, it won't be around long enough to worry about.

Enjoy,
Lorence

Sunday, December 02, 2007

Thanksgiving, finally!

Yes, we finally gorged ourselves for Thanksgiving with a huge meal today. Our annual feast was delayed for us due to what seems to be another annual event - colds and bronchitis. With everyone feeling better, we deemed this year's phlegm fest to be over & time to eat!

Boogie and I prepared the menu, a host of traditional foods for the day. This is the menu he helped design:
We started of with Devilishly Good Dijon Deviled Eggs, a real family favorite. I used jumbo eggs this time, so I had to adjust the measurements up a bit. Our main course was also a variation on our regular. I made a ½ turkey from Jennie-O, an "Oven-Ready" turkey. This worked out very well for us since we were able to just keep the turkey in the freezer without having to worry about thawing, and since there would only be 5 of us for dinner, a whole turkey seemed to be a bit much.
On the side we had my favorite potatoes, mashed sweet potatoes using the easy recipe from Cook's Illustrated. The recipe can be found here and here (pdf version). I've made this recipe several times and it comes out perfect every time. It also gives me an opportunity to use my wonderful 50-some year old Ecko Flint potato masher. This time, though, I added a layer of mini-marshmallows on top for Karen, and popped the casserole into the oven with turkey and beans for a few minutes, just to toast the marshmallows.
Our other side dish was traditional green bean casserole. Usually it comes out great, but despite the good reviews from my family, I wasn't pleased with it this year. The beans were off - I couldn't find the right beans. I prefer frozen french-style, but no one seemed to have them so I wound up using frozen cut green beans. It just wasn't the same for me.
The Sister Schubert's yeast rolls were good, though - Karen discovered their great taste a few months back. I'd seen them in the store but hadn't tried them before. They're readily available pretty much everywhere since the Columbus, Ohio-based T. Marzetti Company acquired them a few years back.
And what can you say about store-brand canned jellied can-berry sauce? Is there anything better on this cranberriest of cranberry days? God, I love that stuff (ColumbusFoodie has a great photo of it here, better than the blurry shots I kept taking...)

For desert we had a Mrs. Smith's Cinnabon® Apple Crumb Pie. It's huge, heavy and comes with a bag of cream cheese frosting to drizzle over the dutch apple pie style sugary crumb crisp topping. Yeah, that was pretty darn good. Grandma brought a variety of Kroger Private Select cheesecake slices - I had a couple of those, too, plain and turtle. Yum.
Here's a really bad photo of the spread before I sat down.

Besides the good feeling of a full belly, I also felt thankful for my family, my health (crappy as it's been lately, it's still better than many), my work, my good fortune, and my life in general.
All in all, a pretty good Thanksgiving. I hope yours was good, too.


Enjoy,
Lorence